Sunday, March 23, 2014

The Wonder Tool


The rain had just begun to fall as I arrived at the dock yesterday. This was a day where it was just me and Corleto. After the roller coaster week I just had, I was looking forward to some quiet time with only me and my boat.

I was also kind of excited, for I was packing with me, my new wonder tool.  I had been coveting one for sometime. When I drew up the "Shit List" there was more than one of those wretched tasks that would require this miracle device. It has been described by many of my boating friends as a "must have". Of course I am speaking of my new Dremel.

I unlocked Corleto's companionway with the excitement of a youngster on Christmas morning. I was giddy with anticipation of plugging it into the outlet and hearing that wondrous purr of 15K+ RPMs. I needed to cut or grind something, but what?

The list beckoned.

I could see that the one thing that really needed my immediate attention was the port side chain plate. There was so much leakage it had to be done. So began my first attempt at re bedding.

The port side cabin Plate- water had been getting in.

The nut that held the thru hull bolt came off without too much effort. A good sign. The plate came off with a little coaxing. I observed a steady drip after the plate was removed. I tapped the bolt to unseat it. Then I scurried topside to disconnect it from the shroud and clean the deck depression that the assembly had made over time. Now I truly had a hole though my deck and since it was raining, water had no trouble finding its way into the cabin. I plugged and covered the bolt hole with a piece of duct tape and took the parts below for inspection and cleaning.

With the plate and bolt removed- you can see daylight. The surfaces needed a good cleaning

You can see the corrosion and the crud on all for the surfaces of the chain plate assembly


The Stainless parts showed some minor corrosion and the threads of the bolt were filled with old caulking. The plate itself had water corrosion and needed to be cleaned up.
I soaked the bolt, washer and nut in some Lacquer thinner. I then took a brass tooth brush and used the thinner on the plate. The thinner seemed to loosen the rust and other crud on all the surfaces.

Wonder Tool to the rescue


Then I used that magic tool to remove the rest of the dirt and rust from the surfaces with the metal brush attachment. It made the job very easy.

After everything had been cleaned, as close to original as possible, it was time to put it all back together.
You can see the difference the Dremel brush made on the top of the bolt. 


I had decided to use Butyl tape as the re bedding seal. It had been recommended by many. I applied it to the thru bolt, and the washer. When the bolt and nut were tightened, the butyl would squeeze into the tiny places that water seems to find. The beauty of butyl is it keeps it's malleable characteristics and is easy to remove when the time comes.

You can see the butyl tape applied on the washer and the thru bolt.


A re installed, re bedded and re polished plate
It was a bit of a challenge getting the parts back together with just me and no one to keep the bolt seated topside. After some trial and error, I grabbed my spare car battery and placed it on top of the bolt. That worked.
The re bedded, resealed and re seated thru bolt and washer assembly as seen topside.

It sure was nice to finish up and in doing so scratch one thing off the list. Total time for the job was just under 3 hours. No bad for my first attempt. And when I left Corleto, she was dry on the inside and I had a big smile on the outside.


Tuesday, February 25, 2014

The Shit List

"Where the hell have you been young skipper? 
Have you forgotten me already?" - Corleto

This has been a long hiatus from the boat. I guess I'm one of those fair weather fools perhaps. Time has been short this winter season and what time I have had has been spent on the ski slopes with my visiting brother. Weather has been less than ideal I suppose, but with the sun setting noticeably later, my thoughts have drifted back to Corleto and her siren call to the dock.

February marks a year that Corleto and I have been together. To mark this anniversary I had hoped get out on the water and put the laundry up, but life has somehow got in the way.

I have visited the dock with some regularity. Checking lines and the bilge. Making sure that the boat is not iced up inside. The little space heater has done a great job keeping the boat above freezing. We are kinda lucky here in BC as the winter has been less that brutal unlike the winter being experienced in the rest of North America. Just before Christmas I had resealed the leaking port lights. I checked after each major rain event and found that the windows have been truly sealed. I did however discover that I have a leaky chain plate on the port side. I guess that re-bedding will be in my immediate future as the winter gives way to spring.
It was discovered during last fall's ONN Weekend that my fresh water pump was cracked. That will need attention before we set sail for far away anchorages.

Port Side rear chain plate showing signs of leakage


That said, the second annual Never Ending List of Shit to do is beginning to look like this:

Re-bed Chain Plates
Strip Brightwork
Rewire and change out Ignition Key switch
Gelcoat repairs to the deck
Paint gel coat decking
Replace fresh water drinking water pump.
Clean and polish

This Flo Jet water pump has a crack likely from water freezing form a year ago.


I am sure there is more.

But on the other hand, The Sailing Goals list:

Fly the Spinnaker
Man overboard under sail/ both Charlene and I at the helm.
Anchor with Charlene at the helm.
Explore a bit more.
The Gulf Islands or North to Campbell River
Catch some prawns!

Now is there enough of a season to accomplish all that?
I'm sure there is.


Thursday, December 5, 2013

Drippy Windows

Leaky windows, or I suppose the correct nautical term is "port lights". No matter, they still leak when I last visited Corleto for her aforementioned Two Day Oil Change.

With the monsoon season bearing down on Coastal BC, leaky windows were something that was going to have to be dealt with. My experience with anything glass has usually ended in complete disaster.

There was the time I was just playing road hockey as a lad in the school yard when an errant shot found it's way through my classroom window. Cost me cash, detention and I never did get my road hockey ball back. There was the time in my 20's at some party enjoying a cold stubby bottle of brew that I could not seem to hang onto- I have the scars on my thumb to remind me of that encounter with silica fragments. And there was that chard of green wine bottle glass that was finally removed from my left foot after more than 25 years back in the late '90's. So you see my trepidation with all things GLASS.

When I had bought Corleto, the port lights were watertight. We picked her up in a driving rain and there was no leakage into the cabin. That would soon change as at some point during our first summer together she developed a drip coming in from her starboard middle window. It wasn't particularly bad but I had been told that all boats eventually leak though their ports, often the culprit was a seal between the cabin wall and the frames of the "port lights". It was not long before a second drip manifest itself on the port side middle window. My mission now was to remedy this before the heavy rains of winter.

I researched what i could find on the web about "port lights" and windows on Catalina's . The usual suspects at our marina offered what they could about potential solutions. Things like ordering from Catalina Direct a window replacement kit, to retro fitting with frameless windows, to simple solutions of replacing the old seals and re-bedding with butyl tape.

Having never done anything like this before I was certain that I would royally muck this up. I was convinced that once I got into this and removed the frame from the cabin walls, it would leave a hole so big and a project so complex that it would take me months to repair.

"Murman, you gotta chill the hell out. Take a breath, it's not as complicated as you think"- Corleto


The gentle prying to begin with my puddy knife

Here goes nothin', I got my tools together and began to disassemble the port frame from the inside. All the while being careful with my screwdriver so as not to slip and crack the glass. When that was completed and all the screws were in a secure place, I went topside to begin to pry the frame free of the cabin. Patience was the order of the day and surprisingly, given my impatient nature, I took it slowly. Once the frame was free and the old butyl tape removed, I was delighted to see that no moisture had penetrated the core of the cabin walls. This led me to believe the leaky problem was in fact a seal between the glass and the aluminum frame. This turned out to be the case for both port and starboard sides. I decided that a simple re caulking of the windows would do the trick.

I took the frame home to perform the task as light was beginning to fade. Also with temps dipping and early morning dew expected, I figured having the sealant cure at room temp at home would be better in the long run.  I sealed the gapping holes with plastic and duct tape and prayed it would not rain overnight.
Applying a bead of caulking, less on me and more where it is meant to be.

My experience with all things made of glass, as briefly described earlier, pales in comparison to my experience with a caulking gun. Caulking usually ends up everywhere EXCEPT the very place I am trying to apply it. Sealing my first port light would be no different, got it on my shirt, on my pants but managed to spare my hair, but I did manage to successfully reseal glass to frame. Port light number 2 would be some what easier learning from the lessons oozing sealant that found its way to the correct crevice.
Trying to keep it neat.


After an over night of curing, it was back to Corleto for the install. I lined the frame with butyl tape and then gingerly shoved the frame back into place. Gently using my closed fist to "bump" it into its cabin hole. I was delighted that my make shift patch had kept any moisture out of the cabin structure. After a couple of choice nautical F-bombs, the frame settled into its correct position. Returning inside I assembled the inboard frame collar and screwed it tight. This sealed the butyl taped outside frame to the super structure of the cabin. A brief smile and the satisfaction of NOT breaking the glass during the process had me feeling pretty good about my window repair.

Now the true test will be when the driving rains begin. Confidence is High.

After the masking tape is removed, it looks ok. Tidier than I expected.


Wednesday, November 27, 2013

The One Hour Oil Change Pt.2

I retired from my "one hour" turned into entire afternoon, oil change a bit miffed at myself. How could I not complete the most elementary of tasks- the oil change. Yes I was holding my engine maintenance manhood cheap at that moment. All because I was too impatient.

On my way home I stopped into the local supermarket and picked up some tin foil baking trays. My thought was I could shape these to fit underneath the oil pan of Corleto's rather cramped diesel.
The idea then would be to remove the plug bolt and drain the over flowing engine oil in a more traditional way. Most marine engine spaces do not allow for a catch basin underneath, hence the many varieties of oil sucking devices out there on the market.

I carefully shaped my tin foil fix and carefully slid it underneath the oil pan. I did this a couple of times, practicing the removal technique as once the pan was full of oil,  I did not want to spill any and have a major mess to deal with. I double check to make sure that the 3 oil drop cloths are placed correctly so as to prevent any potential spillage from finding its way to the bilge.

My home made drain pan that I shaped into place to fit underneath the engine.


With everything in place, I take a deep breath, and begin to loosen the plug bolt. It puts up a stiff fight, but brawn overcomes the plug bolt's resistance. The flow of draining black engine oil begins to fill the makeshift catch basin. The level rising so fast that I decide to put the plug bolt back into place to stop the flow. The oil level dangerously close to overflowing in the basin. My right forearm now as black as coal, covered in old 15W40. I gingerly slide the near full tin foil pan, spilling a couple of drops onto the super absorbent cloths I had beneath the pan. Once out, I placed pan number 1 in the cockpit surrounded with more drop cloths. I then slid into place a second pan underneath to collect the remaining waste oil. It's been messy for my arm, but none found its way onto the floor or into the bilge. I smiled at that small victory.

It took several minutes for the engine to finish draining. The second pan had less than half of its available volume used. I removed pan #2 with little effort and no spillage, after replacing the plug bolt. I smiled and said under my breath, "That wasn't so bad."

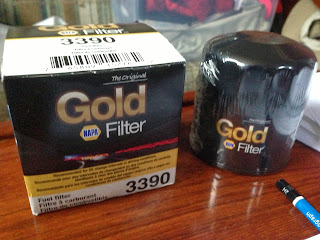
New oil filter in place. 


I funnelled the oil oil in the pans into an old oil container and capped it tightly. This oil would go to the recyclers. Now I could begin to fill to the correct dipstick mark, new clean 15W40. I carefully measured out 3 litres and funnelled it into my little Universal 5411.
After a 15 minute engine run, I rechecked the level, down 1/2 litre. I made note of that on the log. Added another 1/2 and just like that my One Hour Oil Change had turned into a two day adventure.

I'll know better next time.


Thursday, November 14, 2013

The One Hour Oil Change part 1.

My new Skipper has really impressed me. I was a little worried at first, but in April when he went to that diesel self help class, I knew then he was committed to me. -Corleto

The weather had cooled off from those balmy days of September and early October and I knew it was time to get my hands dirty and perform some engine maintenance. My first foray into this dark and mystical world of mechanics would be the OIL CHANGE with a replacement of the OIL FILTER. Keep in mind, until earlier this year, I had no idea what a diesel engine even looked like.

After my trip to NAPA to stock up on the right filters for my engine


After checking my notes from my April class, I made a list of supplies that had to be picked up. There was a fuel filter that the PO left for me. As it happens- its not the right one. So a trip to the local NAPA store fixed that. Confidence was high as my friend Aaron skipper of the Rosa Marie and all round boating and diesel engine Yoda was also scheduling his oil change on that same day. He had offered his electric oil pump to assist in this potentially messy task.

With Saturday upon us and the weather too messy for a sail, I confidently set out for the Marina to perform this vital operation. As I am driving along it suddenly occurred to me that I may not have enough oil aboard to effect a successful out come.


No matter, I would just stop off at the Canadian Tire and budda boom, oil shortage averted. But wait what the hell was the viscosity number?? A quick text to Yoda Aaron and boom- he sends me a photo of the oil he is using.

Now you would think that in a Canadian Tire superstore, one that has an entire wall from one end of the building to the other, dedicated to ENGINE OIL, I would find what I was looking for. Nope. It appears that they are not "More than just tires".
Yoda directs me to the closest Lordco which is just a couple of blocks away. There I find a 4 litre bottle of the very finest Alberta 15W40. By now I am over an hour behind.

Arriving at the dock and dropping off my bag of engine goodies, I went to check on Aaron. He was just finishing up his Oil change and we chatted for a few minutes. He briefed me on the operation of the electric oil pump and told me to run the engine before I begin extracting the old engine oil.

The tiny engine compartment 


I went to Corleto, started her up and ran the engine for about 15 minutes.

I hooked up the oil pump to a battery and prepared to begin. The beauty of these little pumps is there is no spillage, something that is very important to a marine environment. I figure I should be about an hour and I would be done. I inserted the tube down the dipstick shaft and started the extractor.
A wave of unbelievable well being came upon me over the drone of the little pump.

The extractor hose down the dipstick well. 


Not so fast Murman-

There's a knock on the hull, Aaron has come to check on his apprentice Oil Changer.
"How you making out?" he asks
"Good, I have been going at this for about 45 minutes" I said.
He reached in and felt the tube.
"It's not very warm, how long did you run the engine?"
"15 minutes or so" I replied.

He explains that he ran his for 45 minutes and that cooler oil will take some time to extract. He is on his way for a bite and invites me to join him. I decline opting instead to wait for the pump to finish its task.

Another hour elapses and I figure most if not all of the oil is now out of the oil pan. It is beginning to get dark as the day wares on. I remove the tube, check the dipstick, and begin to add the new liquid gold into my engine. This is not an easy task as there is very little room. I use a flexible funnel and pour carefully. The PO's notes indicate I only need 3 quarts. I measure and pour.

This takes a bit of time, but after 3 litres, I check the dip stick.

Its almost to the top of the stick, well over the high oil mark on the stick.

SsssssssssHhhhhhhhhhhhIiiiiiiiiiiiiiiiTttttttttttttttttttt!

I decide to retire for the evening, I will have to plan a different method for day 2.


Tuesday, November 12, 2013

October - ONN Weekend

This past 8 months have been a wonderful ride. Corleto has taught me more than I can possibly write down in this short post. And she still is teaching me little lessons each time I visit her at the dock. For the cash I laid down for her, she has been excellent value.

As some of you may remember, a fellow by the name David Kincaid (Kinc) helped me get her to Canadian waters back in Feb. Well Kinc extended an invitation to me to join a fall flotilla with 3 other boats set for the weekend after Canadian Thanksgiving. This fall sail had become a tradition for those involved. Up until this season, I had only heard stories of this fabled gathering. This year the Commodore had made room for one more boat. Corleto had been invited to the dance.

Being a newbie Skipper to the big weekend, Kinc offered his advice and his services to join the crew aboard Corleto. An offer which I cheerfully and graciously accepted.

Kinc and Murman aboard Corleto during the ONN Weekend

The whole idea of this weekend came about some years ago, to leave the first mates ashore, recruit some crew and head out into the "off" seasonal winds and tear ass around the bays and waterways of southern BC, under sail, boat healing, waves crashing over the bow becoming salty sailors each and everyone.

Well that was the idea. The reality was FOG and light wind. It was still a blast and I met some new faces and got reacquainted with some others. It was just great to get out there and have some fun.

Corleto showed herself well on day 1. Light winds in the fog, the group decided to race to the Bell Buoy and then to Snug Cove. After about 45 minutes- the race was called due to light or no winds- Corleto with her drifter sail had been the closest to the mark. I figured the Commodore called it off to prevent the "new" girl showing up the veterans. No matter, Kinc and I claimed victory and we'll just leave it at that.

Andy and Gord of the Sonoran Sol as the sail by Corleto

As the "camera" ship for this event we had mounted a series of GoPro cameras on various parts of the boat. On day two we mounted one on the Sonoran Sol, the Commodore's boat. We came back with some nice pics. Like any gathering, the ONN (Ongoing Nautical Nightmare) group had a ton of fun swapping sea stories and other tall tales over a celebratory "pop" or two when we all arrived at our berths both on Snug Cove and in Gibsons. The food was good and the company was better.

Kinc making sure his credit is good at Corleto's Casino deck

The casino aboard Corleto featured the blood sport of Backgammon. Just ask Kinc who's blood was all over the table,  the Skipper prefers his dice- "Loaded".

Indeed it was great fun, even if the "winds of November" didn't come early. I look forward as does Corleto to doing it all over again next October. Here's the Video- Enjoy


Wednesday, September 11, 2013

What's in the Bags?

It has been a pretty good summer for me and Corleto to get acquainted. She has tested, teased and taught me much. She reveals herself in bits and pieces, she likes to be sailed, she likes to be clean and she enjoys to be pampered. What boat doesn't?

She has rewarded me with the ultimate in escapism- that great place we all seek- refuge from our daily lives, a place to recharge and reload my mental batteries. Even if I do not get out on the water and hoist the sails, just sitting at the dock, putzing around, fiddling with wiring or messing around with rigging, there is a satisfaction and a peace that is hard to describe. I am a lucky man.

When I bought her back in February, she came with a full sail inventory. A Main, working Jib, a storm Jib, a Spinnaker and a sail called a Drifter. I believe when Corleto was a younger girl, she raced. One of her previous Skippers likely loved the competition. 

I did not buy her to race, I bought her to learn and to cruise. The majority of my time aboard her we have flown her jib and main. And you know, that was fine getting to know her and how she handles at different points of sail. 

But me being me, I gotta know what's in the rest of the sail bags. I had never flown a spinny. I don't even know how they are supposed to be rigged. I figured I would save that one for next season, perhaps take a Spinnaker Clinic at Coopers in the spring. But what really intrigued the hell out of me was this head sail called a "Drifter". 

I set out on the info web to find out. You know the folks who contribute to the Sailnet forum, they know their stuff. Several told me what I could expect from a "drifter" and come to find out it is a perfect light wind sail. 
Heading out for another beautiful day on the water

Well I could hardly wait to get back to the boat and fly this beauty. But every time we left the dock, the winds were too strong for the drifter. Then one afternoon while Charlene and I were out enjoying our day, the wind seemed to disappear. Both of us had been enjoying the quiet that comes with sails and a silent engine. I decided that this would be the day that the drifter would come out of the bag. 

The Drifter
I was astonished at just how big a sail it was. Once hoisted, Corleto reacted nicely. She liked the drifter. The hull began to glide through the water with barely a breath of wind filling this newly discovered beauty. 
We put it through most points of sail and enjoyed the ride. Before I knew it as the day began to turn to evening, the wind began to pick up. I turned the helm and put Corleto into a run. Wow. We surfed for a bit as we headed back to Horseshoe Bay, the wind picking up all the way. 

It's a beauty when its full, the drifter in about 4 kts of SE wind
Dousing the drifter with a steady wind was a bit of a challenge, but with Charlene on the helm keeping Corleto dead into the wind, I managed to get this beauty down without getting it wet. 
As we motored back to our slip, there were smiles all around. We had done something we had never done before, sailed with some speed with the drifter. 

Smiles all around